Showing posts with label strata quilt. Show all posts

Tuesday, April 30, 2013

Seashell Strata Quilt - Using Stonehenge Fabric - Uses Jelly Roll 2.5 inchesx45inches - Fabric Strips

Finished Quilt

Seashell Strata Quilt 
Using 
Stonehenge Fabric 
 Jelly Roll 2.5"x 45" 40 Fabric Strips
I gave this Quilt to Emily because she is expecting a baby
and I am hoping she will use the quilt as a
 floor quilt this summer for the little one.
Emily loves the beach and likes things clean and simple. I thought she would like this and get a lot of use out it.

How I did it:
Quilt in Process 
pinned on an old vinyl tablecloth design wall


The Top sewed together

Supplies:
128 2.5"x45" strips of 8 different fabrics
12.5 Square Ruler
Sewing Machine and Quilting Supplies


1. Make 4 stratas (strip Pieced unit). A strata is made by sewing lengthwise 9 different strips together. Sew each strip together by sewing in a different direction each time you add a strip, this will insure a Flat strata, not curved. Must measure 18" x 45"


2. With the 12.5 Square, lay it on the strata, as shown above, cut two squares out on a diagonal, centering each and you will get a diagonal square as shown (below)


3. Now separate the seam between strip 4 and 5, of the leftover inside pieces as shown (above), turn these pieces upside down and sew strips 1 and 9 together to form another 12.5 square. Square it off with ruler and cutter.

4. Repeat this strata process 3 more times for a total of 12 blocks. Take the 12 blocks and arrange as desired


5. Take the extra pieces of sewn together state and sort them by the way the diagonal strips go together. Sew them together to make long lengthwise borders. Extra strips can be cut in half lengthwise to make the inside border of 1.25 inches and they arrange the diagonal pieced strips around the inner border for the outer border. This way you use up all your material to get the quilt top.
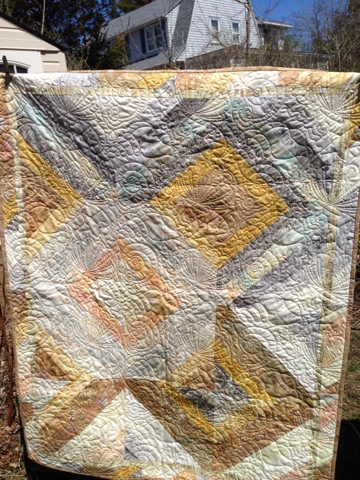
Note the 1.25 inch inner border
and the diagonal pieces outer borders


I had the quilt professionally quilted at The Quilt Place in Rockledge, FL. I also bought the fabric there too!I decided on a a sea shell motif quilting pattern and I used Stonehenge fabric for the Backing and Binding. I also used a variegated red, orange, and yellow thread for the Quilting. The Quilting came out wonderfully!

The effect is a strong beach motif on what looks like sand and stone. I imagined this being a quilt used on the floor for a baby and the idea is a day at the beach.


Quilt Top Measures 44" X 54" so its a good size
for a Babies floor quilt or for a small child's bed.


The Backing looks like Sand and 
with the Shell and 
Starfish Designs 
it really feels like the beach! I used a darker brown
binding fabric to frame the whole thing and I think it came out well. I think if you wanted to make this a King Size Quilt, you could use 4 of these panels sewn together or 4 jelly rolls. The effect would look more balanced in a larger quilt.  This was a good project for me to practice my skills and I also just fell in love with the Stonehenge Fabric and this was a design I had learned and wanted to try my hand at making on my own. I am happy with how it came out and I hope it gets years of love and use with the new baby.

Happy Quilting,
Melissa


Thursday, April 18, 2013

Crazy Psychedelic Brown Bag Strata Quilt - Photos and Instructions

I went to an event at Coastal Eduquilters 
http://www.eduquilters.org 
in Satellite Beach, Florida in January 2013 and they handed everyone a Brown Bag with 2.5 inch x 45 inch fabric strips in it. The action was to: "Make a Quilt". This is how we did it. I did not choose the fabric colors but the fabric was very high quality cotton quilting fabric and I would never have chosen such bright colors but I was game to try anything and after putting it together I liked it and I liked the process of it. I have made small quilts but I think in reality this was my first ever quilt where I got instruction and support, made with other quilters in a very positive and uplifting way. I loved it and the bug of quilting sort of bit me making this quilt. 


Supplies:
128 2.5"x45" strips of 8 different fabrics
12.5 Square Ruler
Sewing Machine and Quilting Supplies


1. Make 4 stratas (strip Pieced unit). A strata is made by sewing lengthwise 9 different strips together. Sew each strip together by sewing in a different direction each time you add a strip, this will insure a Flat strata, not curved. Must measure 18" x 45"


2. With the 12.5 Square, lay it on the strata, as shown above, cut two squares out on a diagonal, centering each and you will get a diagonal square as shown (below)


3. Now separate the seam between strip 4 and 5, of the leftover inside pieces as shown (above), turn these pieces upside down and sew strips 1 and 9 together to form another 12.5 square. Square it off with ruler and cutter.

4. Repeat this strata process 3 more times for a total of 12 blocks. Take the 12 blocks and arrange as desired

5. Take the extra pieces of sewn together strata and sort them by the way the diagonal strips go together. Sew them together to make long lengthwise borders. Extra strips can be cut in half lengthwise to make the inside border of 1.25 inches and they arrange the diagonal pieced strips around the inner border for the outer border. This way you use up all your material to get 
the quilt top.
This is me arranging the
12 squares on a design wall


Quilt top sewn together
The Quilt after it was professionally quilted in a
curlique pattern hanging on my cloths line
You can see the Quilting in the Day Light


Curlique
Close ups of the Quilting


Backing with solid Blue Binding


Close Up of Backing
 I used a Red Quilting Thread

Above: Two other quilt tops being done by friends at the same time. I am showing this so you can see the fun and variation you can have designing this Strata Quilt. If you sew 4 of them together, you have a nice Queen/King Quilt. The size of these are 44 inches x 54 inches which is the size of a large baby quilt or a small child's quilt. Makes an interesting wall hanging as well.


My finished Crazy Brown Bag Quilt!
This project was a lot of fun. I was handed a bag of strips and this is what came out of it. I enjoyed just trying to make it work. In my wildest dreams I would never have picked out this fabric myself but it was fun using what was at hand to create something beautiful and interesting. This is the first time I had ever made something that I had professionally quilted. I had it quilted at "The Quilt Place" http://www.thequiltplace.com in Rockledge, Florida. This is a world class quilting store with floor to ceiling quilts, fabric, ideas, patterns, a classroom, and a quilt retreat facility nearby. I really enoyed making this so I thought I would document the process here. Someone told me they thought this was the ugliest quilt they had ever seen and I have to laugh because my experience of making it was such a joyful and positive thing that it just makes me happy.

Happy Quilting,
Melissa