
 |
| Template |
 |
| Quilt Top: Before being Quilted |
I made this quilt in the winter of 2013 after seeing it demonstrated at Eduquilters.org a group that meets in Satellite Beach, FL. They are a fantastic organization committed to projects like children's hunger, education kids in schools quilting, and donating quilts to homeless children and those less fortunate . Spearheaded by Margie Engel, who is a friendly force of nature and the dynamic Sheryl Milner together they hold a torch for educating the art of quilting. What a Blessing they are! I was welcomed into their group and this was one of the first projects I worked on there and it came out spectacularly. Being a novice quilter, it was gratifying to learn some techniques in a very positive way with a demonstration and then time to work on the project. I adore fabric and color.
 |
| You fold a pattern and stitch along the sides as a template |
 |
| Stitching along fold |
 |
| Lining up the fold of pattern with pieces of cloth |

 |
| The Blocks! |
 |
| An Idea I never ran with! |
 |
| Stitching along fold line |
 |
| Variations of what you can do with this Template! |
 |
| Lining things Up! |
 |
| Variations |
 |
| Cutting out the block after stitching together the pieces that are sewed together along fold lines |
 |
| You assemble 4 of these stitched patter pieces to create a star. Ingenious! |
 |
| This is Sheryl Milner stitching along the fold |
 |
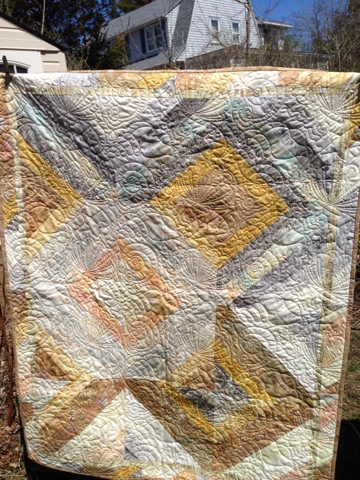
| This is the Quilt after I had it quilted out and it looks fantastic. I had it professionally quilted at www.thequiltplace.com . The Quilt Place is a state of the Art Quilt Shop in Rockledge, FL run by a wonderful woman named Theresa. Not only do they have several long arm quilting machines constantly working, they have over 12,000 bolts of fantastic quilting material. I think they did a fantastic job! |

These are the Quilts I made in the winter of 2013


I really loved making this series of quilts and it was a fantastic learning experience for me!
 |
| Template - Measures 6"x6" |
Sheryl Milner's Instructions:
RST=Right Sides Together
The Numbered Side of the Pattern is the WRONG side of the block. This is the side all the sewing is done.
The back side of the pattern is blank, it is the RIGHT side of the Block. This is where the fabric will show.
1. Fold the line between #1 and #2. This will be your sewing line.
2. Lay fabric for #2 Right Side Up on the Table
3. Lay the fabric for #1 Right Side down on top of #2 (basically RST with fabric #1 on top)
4. Lay paper pattern with it folded back on fabric leaving 1/4" of fabric beyond the paper. Space #1 on paper will be lid back on fabric. Pin or hold in place and unfold the paper over so you can see the sewing line.
5. Sew on the Line. You can take a couple of stitches beyond the end of the line.
6. Turn over to the fabric side and finger press the seam.
7. Fold back the paper between #2 and #3
8. Trim off the excess fabric of #2 so only 1/4" shows beyond the fold line.
9. Lay Fabric #3 with RS (Right Side) up on table.
10. Lay your pattern on top of #3 RST matching the edge of the fabrics.
11. Unfold the paper so you can see the sewing line. Sew on line.
12. repeat, repeat, repeat until all pieces are sewn on.
13. Trim block to size leaving a 1/4" all around
14. Paper is removed after all the pieces are sewn together.
Happy Quilting,
Melissa


