Sunday, March 31, 2013

Make Your Own Ocean Themed Place Mats - Full Instructions


Make Your Own Ocean Themed Place Mats

To make these 6 mix and match style placemats with an oceanic theme, I picked out 1/2 yard of 6 different coordinating fabrics. You could make them all the same if you like but I decided to do some variations using some of the wonderful Batik fabric that is out there and coordinating it with some other cotton paisleys I liked. You will need about 2 yards of batting for this project. I used Dritz adhesive basting spray and coordinating thread for this project. You are quilting each piece as you go along so you want to make sure that your bobbin thread coordinates well with your backing fabric. I also make sure to have a good pair of sharp embroidery scissors to clip threads and I am using a very Sharp Microtex style quilting needle in the machine.

The way I cut the fabric with a rotary cutter, and clear quilting ruler on a mat was this:
Backing Fabric: 6 panels 15"X 21" iron 1/2 inch fold all around each of the background panels
Focal Center Fabric: 6 panels 7" x 13"
Small Frame Strips: 12 strips that are 1"x 15" ironed 1/4 inch up on one side of each strip and 12 strips that are 1"x 8" ironed up 1/4 inch up on one side of each strip
Outer Border Strips: 12 strips that are 3" x 13" and 12 strips that are 3" x 18.5". On each of the 3" x 18.5" strips iron up one side 1/4"
Batting: 6 panels that are 13" x 19"


My Assembly Line
Iron up the edges of each backing 1/2 inch


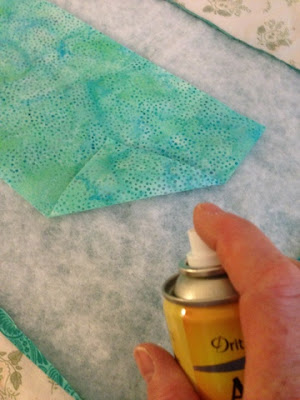
Spray Your Backing
with
Dritz Adhesive Basting Spray
 (I didn't use much)


Center the Focal Center Piece. I measure approximately 3.5 inches on each side and eyeball it so it looks centered. 


Spray a little Adhesive Basting Spray to hold center focal piece in place. I just lift up the edges and give a small spritz
Iron the 1" side strips over 1/4 inch and do the shorter side strips first.
Position them with Pins as shown above


Sew a straight stitch 1/4 inch in along the edge of the focal fabric. If you sew over pins, sew slowing over them so as not to break a needle.


Once you have sewed the side strip to the focal fabric, lay the 3"x13" outer border fabric next to the 1" inch sewn folded strip. it will fit right between that and the 1/2 inch ironed up border of the backing fabric. Trim to fit snugly. 


Fold the inner strip over 
and pin as shown above on both the right and left sides of the placemat.


Now position the longer 3" X 18.5 outer border fabric as shown above with the 1/4 inch folded and ironed section facing towards the focal fabric on each side
close up of folded edge next to focal fabric


position the 1" strip so that the rough edge is against the fold and the folder edge will be folded over the focal fabric. This is opposite of what you did on the right and left shorter sides of the focal fabric.


Fold over edges onto focal fabric and sew down beginning at the folder outer edge seam of the outer border

pin down borders

Sew on Folded over seam as shown
above and then continue
on to 1" border strip

To finish fold over 1/2 inch ironed fold on right and left shorter sides 1st and pin as shown above and below


After pinning the sides, fold down the longer top
Corners will look like this. There may be better ways of finishing off these corners but it works well enough for me this way.

After you have pinned all around the placemat, carefully stitch a straight stitch all the way around, snip off all the loose ends and you are done! Congrats!


The back of the placemat will look like this and be just as pretty as the front. You can use this side at your table as well!!


Finished Placemats. You might want to do additional free motion quilting in the centers and that is something I am considering doing but you can use these just like this for your table and you are good to go!
My finished 6 placemats! They came out really beautifully and I want to make more and even try some other themes and colors.


Happy Sewing,

Melissa


Friday, March 15, 2013

Appliqué Canvas Bag Project


What a day today making this Applique Canvas Bag! I had some leftover fused fabric from an Art Quilt Project so pulled together this Sunflower or Blackeyed Susan Flower still life as an inspiration for the bag. I had bought the bag during a recent quilting project with Eduquilters www.eduquilters.edu 

We were tasked with decorating them with any sort of quilting or ideas we could muster up. I originally bought one of the bags but didn't think I would have time to pull together the project but I was inspired when I saw some of the other women's projects and decided to give it a go and do a still life inspired theme of sunflower, daisies, or just plain fantasy flowers!!


I managed to decorate the flip side with a couple of floating flowers and my last name too!! WOW, I was on a roll wasn't I?


This is a detail. I ironed on Steam-A-Seam and cut out shapes for the design. It is a lot of fun to cut out shapes and design the idea. When the fabric has the steam-a-seam applied it makes it tacky so you can pick it up and move it around. When you get you design the way you like it, you iron it on. 


After I ironed on my design. I zigzagged around the edges in a free form way giving an added structure and design element to the piece. I really love the look of the batik fabric when doing this!!


This is the "other side" of the bag and I was happy I was able to put my name on the bag too. Just like  LLBean only better. This really makes your canvas bag completely original and beautiful. I am excited by doing this and I look forward to trying this project again with a a bag I make from scratch! There are so many ideas and motifs one could use. I am thinking Mermaids or Matisse, I don't know which but the possibilities are endless!


This is the Steam-A-Seam Product I used to make this Applique. It is a fantastic product as your fabric sticks while you are sewing it on afterwards. You can choose to do this without the sewing if you like as well and the look is great but I felt I wanted to strengthen the design with the zig zag sewing.

Happy Quilting! I love You ALL!!Melissa

Monday, March 11, 2013

A Dream Came True - The Story of Visiting Nantucket, finding a Basket Teacher there and eventually making a Nantucket Basket Purse


Finished Nantucket Purse
Beginning of Nantucket Basket Purse 
 Putting the Staves on the Mold
I learned how to make Nantucket Baskets on the Island of Nantucket off the Massachusetts Coast one fall day in 2004. My husband's construction company had business remodeling a private home and the Nantucket Whaling Museum in both 2004 and 2005. His company rented a home there for the workers and on the weekends they went home so we traveled to Nantucket either by small plane or ferry. We went to Nantucket quite a few times both on week days and week ends over a two year period. 

I loved spending time on Nantucket Island. I loved the cobblestone streets, the architecture, the onion globe lights, and the history and traditions of the island. I loved the Fall and the Christmas season there and we even attended their Christmas Walk one year and saw a charming play in the local church.
After spending some times on Nantucket and imbibing the culture and flavors of the island.  I became intrigued with the Nantucket Baskets in the local shops. I had actually seen them often over the years and I had always been mesmerized by them. They were actually a popular preppy style item during the 1960's and women of a certain gold charm bracelet, Lilly Pulitzer dress style always seemed to have one on their arm. During this trip, I saw baskets in the shops and read that originally they had been made commercially on the Nantucket Lightships which were anchored off shore and used as Lighthouses on the Nantucket Shoals since the 1880's. The older baskets had perhaps originated from some designs or even been been copied from Native American baskets from the whaling days and even before that time on the Island. In the 1940's a talented basket maker named Jose Reis popularized the covered purse style. His original purses which sold for around $15 a the time are very collectible and valuable nowadays.

I picked up a copy of the Nantucket Mirror and Inquirer, the local newspaper that had been in business since 1821. I read the newspaper and it hung around on the table for a couple of days. I couldn't help but notice a 2 col and 2 inch ad on the back page. I looked at it over and over again. It was an advertisement for Nantucket Basket Making lessons from a man named Peter Finch. I rang him and made an appointment to have a lesson to make a basket. Since I didn't have a car I walked a ways to his grey shingle house with a clamshell driveway outside of town on Pollywog Lane. That is where I got my first mold, a 6 inch berry basket. I visited his home a few times for several lessons and even visited him once I had learned making them to show him my baskets. He told me I would never want to give away my first basket and I still have it, a 6" berry basket with a handle.
.


Last August 2012, I was visiting a friend on the "Cape". In Massachusetts lingo that means Cape Cod. I stayed a couple of days and caught up with her. Her mother had been a Pine Needle Basket Maker and I consigned a couple of my Pine Needle Baskets 


to the Black Whale Gallery in Hyannis ( blog post link http://gloucesterwomanbaskets.blogspot.com/2012/08/trip-to-black-whale-gallery-hyannis-ma.html ) and when it was time to leave I put the coordinates into my GPS for a place called  D.E.L.S. in Middleborough, MA, famous for making Nantucket Basket molds. I was keen to acquire a purse mold and after an amazingly complicated ride through the back roads of southern Massachusetts, I found the place, spent about three hours there and left with an 8" Nantucket Basket Mold and a few other supplies. I was psyched and on my way to making a Purse.

I tried to weave as tightly as possible over the wooden Mold I bought at D.E.L.S. It sure was hard getting it off the Mold. There must be a trick to it but I just pulled and pulled and it came off, what a relief.

D.E.L.S. - Makes Nantucket Purse Moldshttp://www.delsnantuckets.com
Shaping the Rims


After I got the body off the mold I had to shape the rims. I had bought pre shaped rims from D.E.L.S. but they still needed to be soaked in a bit of warm water and then shaped to the exact size of the basket. I glued them and let them sit for a day or so to dry. Then I glued and nailed them to the rims. I looked everywhere around the house for clamps to use. As you can see from the photos, I had quite a collection.


In the above photo, I am gluing on the rims and beginning the purse top or cover. You have to remember that these baskets were state of the art in the times before plastic bags. Apparently, the tradition on Nantucket Island was that everyone had their own basket and often it would have their name carved in whale bone with scrimshaw which is a technique where designs and writing are scratched into the bone and blackened with India ink. The names on the baskets were so as to identify the baskets  at church suppers. Whale bone was something they had a lot of and they used it for findings on the baskets. The early settlers of Nantucket Island learned about Whaling from the Wampanoag Indians there. They would fish for whales just offshore as the whales passed by Nantucket Island fairly closely at that time. It is also thought that the tradition of the baskets also came from the Indians on the Island who originally weaved them from pine needles. Later, when the whalers went to the far east they brought back cane and rattan to use and it replaced the pine needles. There is still a tradition of making pine needle purses similar to the Nantucket Baskets in Mattapoisett, Massachusetts (see my blog on them:http://gloucesterwomanbaskets.blogspot.com/2012/06/i-have-always-loved-pine-trees.html  . 

Eventually with the incorporation of more modern materials in the baskets, such as rattan, cane, and various woods, a very sturdy and practical basket was designed. The original molds for some Nantucket baskets were often woven over old boom and mast pieces from whaling vessels. The older molds are highly prized by the local Nantucket basket makers to this day.
Pictured: The Purse Top Mold with Basket Body Finished just before I lashed the rim with some small cane. 

I really liked the lashing part, like sewing. Something very satisfying about doing it because it made it really sturdy and strong and gave the basket a certain integrity.

I did not have instructions on how to make the top part of the Purse. There is a little cut off mold for it and I was told it was hard to do. I am pretty much a novice Nantucket basket maker but was very interested in trying to do it. With a wing and a prayer I started it and it wasn't too bad.  It was fairly straight forward until I got to the rim part and there was a little bit of pushing and pulling the cane to get it to lay right as I molded the top rims onto the edge or lip of the basket and got it to match up exactly with the bottom.


Weaving the Purse Top. You can see my purse bottom finished in the rear and the lashing done on it.
This is the Finished Basket. I used Bone Findings and a Bone Shell for a decoration on the top. I want to learn Scrimshaw so I can make my own nameplate for the interior and thats one of my next projects. I connected the top and bottom of the basket with leather lashed with cane and sewn into the basket as hinges. I just tried to copy some photos I had seen. I thought it came out pretty well for a novice.

I have used this basket for over 6 months now as my purse. Everywhere I go, people comment on it and tell me I could sell them and that it is beautiful. To tell you the truth, I just couldn't sell this basket as it is my own personal basket. So far it is the only Nantucket Purse that I have made. I have aspirations to make another one soon using cherry wood and a Bone Whale Carving I have procured.


I lined the interior with some 

fabric that is velcroed 

to the basket so it can 

be changed or removed

for cleaning. I used a pretty purple paisley with a nice sheen to it and it is very pretty. I thought about lining it with leather and I can always do that if the other wears out.

I remember as a little girl always wanting to make baskets. I have always been entranced by them for some reason. The whole project of making one is interesting because you get to pick and choose natural materials from nature and the world around you. This practice is actually very meditative and has a spirituality to it that is somehow translated into the baskets themselves. I always had a dream to make a Nantucket Basket and this is a small chronicle of my process. People ask me, how long did it take you to make it? My answer is that it took me a lifetime to make it and only eight years from when I first took Nantucket Basket lessons from Peter Finch on the Island of Nantucket in 2004. It took me 8 years to find D.E.L.S. and buy the mold. However long it took, it was worth it. I feel like it has all my energy and happiness in the basket and there is something so satisfying making something with your own hands. Truly an experience of an Art Form in the highest and best possible way!

Happy Basket Making,
Melissa Abbott


Tuesday, March 5, 2013

The Story of Making American Girl Doll Wardrobes for Very Special Girls in my Life, Madison and Alana - Given on Christmas 2012


Pattern I used for Doll Clothing


                I hadn't made any American Girl Doll Clothing since my daughter was young and I had the idea to make some for some very special children in my life, Madison Age 4 and Alana Age 1+. They are a little young for American Girl but they both received American Girl dolls already and I just had the idea to make the clothing to get used for when they are ready to play with them. I bought this pattern about a year ago and started making doubles of each piece of clothing for the two girls. I have to tell you that making the clothing small is almost as complicated as making larger child size pieces. It took me 6 months of on and off sewing to pull together the wardrobes for each girls doll. They were ready for Christmas 2012 so I decided they were nice enough to give as presents.  I also knit 2 little purple ponchos for each girl's doll too and they came out really cute.


Here is a photo of Madison with her
 American Girl Wardrobe at Christmas.
I had given her the American doll the previous year
 but she still wasn't playing with it yet but was dressing a smaller doll all the same.

I had found
a small wardrobe
in a used furniture store and put
a bar in it to hang the clothing.

I then bought doll hangers and some black Mary Jane Shoes on Ebay. I also bought some American Doll plastic purses, barettes, and combs at a place I visited in New Hampshire last Fall. I had some miniature books to add to the doll closet collection too! It was fun making and collecting everything I needed for the Wardrobe.


This is a photo of Madison last summer
with her brother JJ, Mom, Emily, and Dad Jim
on our boat in Gloucester
A Little Fleece Jacket


Dress I made for Madison to wear which matches the
American Girl Doll Dress below
This is the American Doll Dress I made Madison for her Doll. I had also previously made her a dress
like this in this same material for her to wear.
I wish I had a photo of them wearing the dresses together but I don't yet.


This is supposed to be a Bride Outfit


Interior of Painted Wardrobe
with Hangers and Doll Clothing


You can see the books, plastic purse with comb and shoes
This photo was taken while I wrapped them.


Knitted Purple Poncho
Hard to see but they came out really cute.
 I knit two of these for each girl's Doll


Little Jean Shorts


Bathing Suit with Wrap Skirt


Little Skirt, Blouse Hat and Shoes on Hanger


Some little Miniature Books I found, I sent them each
2 little books with the Clothing


This was the Box of Doll Clothing that was sent to Alana in Hawaii where she lives now.  Maybe when she gets a little older I will make her a Doll Closet of her own but for right now I found a pretty Box for the American Doll clothing to stay in till she is ready to play with it.
this is the box closed before I wrapped it
and sent it to Alana for Christmas 2012

Alana got to visit us in Oct for her Birthday. She flew all the way from Hawaii with her parents Haley and Brian. While they were here Alana even ate Lobster and had a 1st Birthday Cake. 
Alana playing with our kid's kitchen we have in our hall.
All the kids love it so much!

Pretty Alana 

Alana blowing out the only candle we had for her Cake! It was Chocolate!

It was so much fun and a real privilege to be able to make
American Doll Clothing for each of them. This is the story of how I did it and what it looked like when I did.

Love, Melissa